This is really one of my go to's to make for gifts or if Abby's wardrobe needs a little pick me up because it is SOOOOO easy and takes so little fabric (a requirement for c'est moi since I don't live within a half a million miles of a normal fabric store).
What you need:
Scissors
Thread (matching color to your fabric preferred but not required)
Two Buttons
1/2 yard fun fabric
1/4 yard corresponding fabric or a solid you think looks stellar
Some patriotic music to sew to
Some paper to draw the pattern, if you think you are going to make this more than once, or feel more comfortable cutting fabric with a guide
Alright, once you have everything gathered we are going to use our paper first. Okay don't laugh at my drawing-- to hard. I make no claims to be an artist and love sewing because it is so much more forgiving. Roughly (key word) Draw a yoke shape on the paper. 
When I cut this out what I will do is fold the paper down the middle and only follow one side so that when I open it up it will be even :) Sneak peaky. This will be on the back of the dress and come up over the shoulders so it needs to be a little longer. Make sure to make it wide as you will be sewing and turning it inside out. Now make a second yolk with stubbier tails. This will be the front and does not need to go up too high. You will need two of each of these, or four pieces total: 
Now we are going to do the main part. Take a paper and fold it in half. Keep in mind you will be gathering the top straight portion of the dress to fit into the yokes you just made to give the top some volume. Draw an arch from the top to the side, for the arm hole. The length depends on how long you want the tunic to be. I wanted mine fairly short since Abby uses crawling as her main mode of transportation. All of this is very rough and easy to adjust once you get sewing. (See what I said about forgiving, eh). 
Now grab your fabric and make sure you have enough :
Pin your top pattern on and cut out two. Placing right sides together sew up the two sides. I was to lazy to drag out the surger so I ended up just going back over it with a zig zag stitch. 
Now finish up the arm holes by making a little hem. (Sorry I didn't snap a pic of this step) Now that everything is nice and connected, shirr the tops of the dress making sure to leave a long tail to allow you to make adjustments. 
(Yes I shirred mine before I connected them, very naughty, much easier to do it the other way) Now for the neck portion. Place the two yokes (am I using the right word? that seems weird but I swear thats what they are called.... hmmm please feel free to correct me I don't want to sound ridiculous, I need my street cred and using the wrong terms is just lame) anyway place them right sides together. Now start sewing at the top right corner. Come down to the bottom of the U and back and forth. Cut your thread. Leave an opening across the bottom of the yoke. Place your foot at the bottom left and continue to sew all the way around until you are back where you have started. 
Do this to both sets and you will have your front and back. Now go a ahead and flip them right sides out. At this point I like to press them making the necessary folds at the bottom this makes attaching it sooo much easier. 
Now go a head and place the top gathered portion of the tunic up into one of the little pockets you made. (Both sides are the same so it only matters what side you want to be front, you know, if there is a cuter part of the pattern you want mainly seen or what have you ) Pin it at the corners
Once again starting at the top right, top stitch all the way around the yolk, making sure not to sew over your pins. 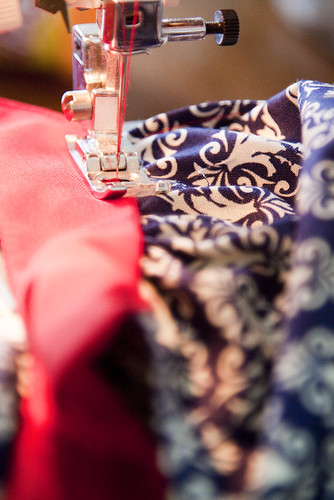
(I have totally done that before and it sounds horrible, and then you have to replace your needle, which takes time us sewing mommies don't usually have). Now go a head and hem up the bottom how ever largely you would like. Whoo hoo you are sooo close! It should look something like this: 
Okay now for the buttons. If you are Miss Super seamstress and know how to make a button hole with your nifty button hole maker you can skip this part. My button hole attachment disappeared days after I got my sewing machine, and I have never replaced it so I just do it the old fashioned way. I take my seem ripper and after measuring my button a little, rip a tiny hole where I want the button to fit through. 
I then hand stitch (I know archaic right, yet oddly gratifying) a loop stitch all the way around the hole to reinforce it. I make sure my button will fit through and then attach it. I am in dire need of some buttons. My mother in law gave me a ton of fantastic vintage buttons and these were the last set of matching ones. It was serendipitous because I think they look kind of militarily patriotic. Once your buttons are connected that is it! There is nothing to do but try it on and drag your poor unsuspecting daughter out in the yard for a photo shoot! 
Or wait am I the only crazy person who does that :) She doesn't look too upset by it though. I think it is because she loves her shoes, they were mine and my mom saved them for my daughter, how AWESOME is that! 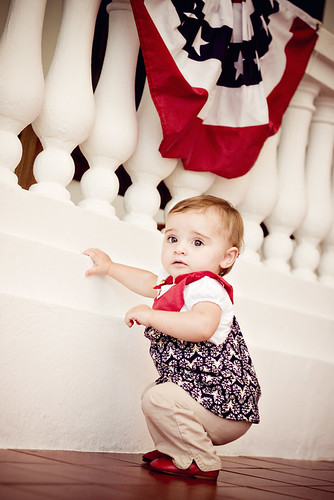
Of course you could add pockets, ruffles ric rac, what ever. I just wanted something a little plain for this holiday. Have fun and as always I LOVE to see any you make! I also have a Fourth of July Boys shirt I want to upload if the internet would stop going in and out... hopefully I can get that up because come on there is a HUGE void when it comes to sewing for boys :) If I don't get back on have a FABULOUS fourth, enjoy some fireworks for me!
Saturday, July 3, 2010
The Fourth of July Tunic
Tuesday, June 29, 2010
Baby Tuxedo dress tutorial
I originally wanted to make this dress for myself as a birthday dress, but I don't have enough of any cute fabric for me, so Abby gets a cute dress for moms birthday! It may look daunting but is SOOOOOO easy I promise. Just be patient and remember you are working with fabric so a little stretching or pulling goes a long way. Also a lot of this tutorial is arbitrary, if you would like defined measurements etc. you should probably pass on it and stick to patterns. (ew that sounded brattier then I meant it...sorry)
The Materials you need:
A onsie or, for a bigger girl, a plain colored shirt that match's your fabric. Either long or short sleeve works fine.
1/2 yard of cute fabric
2 coordinating fabrics with 1/3 yard of each (just long strips of whatever fabric you think complements the main fabric.)
Fabric for the center tuxedo portion or the button section cut from some other outfit you decided is so far gone you might as well cut it up
Coordinating buttons
light weight fusible interfacing (just a little square)
Thread
Sewing machine
OPTIONAL: Ribbon or string for drawstring waist
Not optional: Some good tunes to listen to while sewing.
(I am a visual learner so pictures will come first in my tutorials. If you get what is happening you can probably skip the explanation)
STEP ONE: 
Cut off Snaps from onsie to make a long shirt. I also want 3/4 sleeves so I cute some of the arm off. 
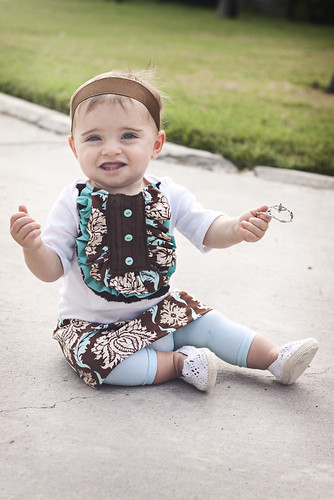
Cut your strips keeping in mind that you will need less fabric for the inside ruffles. How much fabric should you cut? That depends how ruffled you want your tuxedo top to be. To be completely honest I think I went a little over board on Abby's ruffles. The strips are super wide (2inchs) and were really long so the ruffles would be thick. They sometimes stick so far up she can suck on them and makes this face when they tickle her: 
It is up to you and how funky you want it to be. I probably will scale it back for the shirt I am going to make her tonight. ANYWAY,
This next step is optional since the ends will be hidden when they are sewn onto the shirt but I am a bit neurotic about unfinished edges so I hemmed up the ends of my strips. 
Now using your shirring setting gather up those bad boys leaving a long tail of thread at the end. (If you need to learn to shirr you can read THIS, it is a very useful thing to know how to do) If you want the ruffles to be bigger just grab one piece of thread at the end and tug on it. Push along the gather and repeat until you have it as ruffly as you want. 
There you have it a lovely pile of ruffles. At this point I decided that I should probably use some interfacing since my ruffles were MASSIVE and a onsie is pretty flimsy material. I only have heavy interfacing which is a bummer because it makes the shirt really stiff. I didn't snap a pick because i was so side tracked thinking of all the sewing stuff I totally forgot to bring to timbuck too. I just cut bib shape piece of interfacing that would cover where my ruffles are going to be placed. Then you can follow the instructions on your particular interfacing to attach it on the wrong side of the shirt right where you will be attaching your ruffles. 
Now the fun part Take which ever ruffle you would like to be seen the least and starting at the top of the left side pin it to the shirt. Proceed to make a "U" shape, pinning where you feel necessary. 
I pinned at the "corners". Make sure at the top, the fabric goes up and over the neck so it is hidden. Sew the ruffle on. I chose the selvage part of my brown fabric because I thought it added a fun texture. (because this outfit isn't busy enough right?)
Follow the same steps with your second length of ruffle. Laying it just slightly inside your first ruffle. Then repeat again with your third ruffles until your shirt looks something like this: 
Step 9:
(I finally got the pic to upload ha! I have defeated you again cruddy internet!)
Now grab the material you set aside for the "tuxedo" section. Out of it you will cut 2 rectangles. Both need to be the length from the neck line to the bottom of the "u" of ruffles you created. One needs to be wider then the gap from inside ruffle to inside ruffle. Essentially you are cutting a rectangle that will fill in the gap. The second piece needs to be less wide as the first but the same length. Hem up the sides of both rectangles. Now this is optional but I decided on the second smaller piece to use the side that the seam was on to make it look more tuxedoey. That is totally your choice. I then attached the smaller rectangle to the larger making sure it was nice and centered. Then you can attach the number of buttons you think looks good, I know the picture shows 5 but in the end I went with 3, I just thought it looked better. 
Before you attach the tuxedo to the shirt I would hem up the bottom edge. You could do this while attaching it if you are super sewer and don't like lots of lines of thread, but who really notices right and it makes attaching it easier. Which, when you are dealing with a mountain of ruffles, is a nice thing. 
That is how your dress should not look! Woo hoo You are done with the hard part! Now for the skirt. This again depends on how long you want it to be on your bubs and how fluffy. I wanted mine to go just to Abby's knees so I cut a long rectangle with enough length to hem and it would be to her knee. I cut it to be 2 and a half the lengths of the front of the onsie. Once I hemmed it up I shirred the top again leaving a tail so I could adjust. 
I laid it on the bottom of the onsie to make sure it it fit and made any necessary adjustments. This is where you can do one of two things. I will first go over if you want a gathered waist. 
Place the "skirt" and "top" right sides together, leaving about a half an inch of onsie fabric hanging blow the skirt. Pin the skirt and then sew around. Once you have done this turn the entire dress inside out and sew the edge of the little "lip" of onsie to the wrong side of your skirt. Now when you flip in right side out you will have a little pocket to feed a ribbon or string or whatever you like through. Just make a a little hole in the seam you just sewed and feed through the ribbon attached to a safety pin. If you think that is to much (which I did AFTER making the pocket) then you simply line up right sides together and sew around. I would highly recommend zig zag stitching or surging this portion so it doesn't fall apart in the wash. 
TADDAH! Woo hoo you are done! (you can see my little pocket if you look closely) I like using a onsie because it makes getting it on and off her head so easy :) Which is good because this little chica is on the move! She took six steps yesterday wow!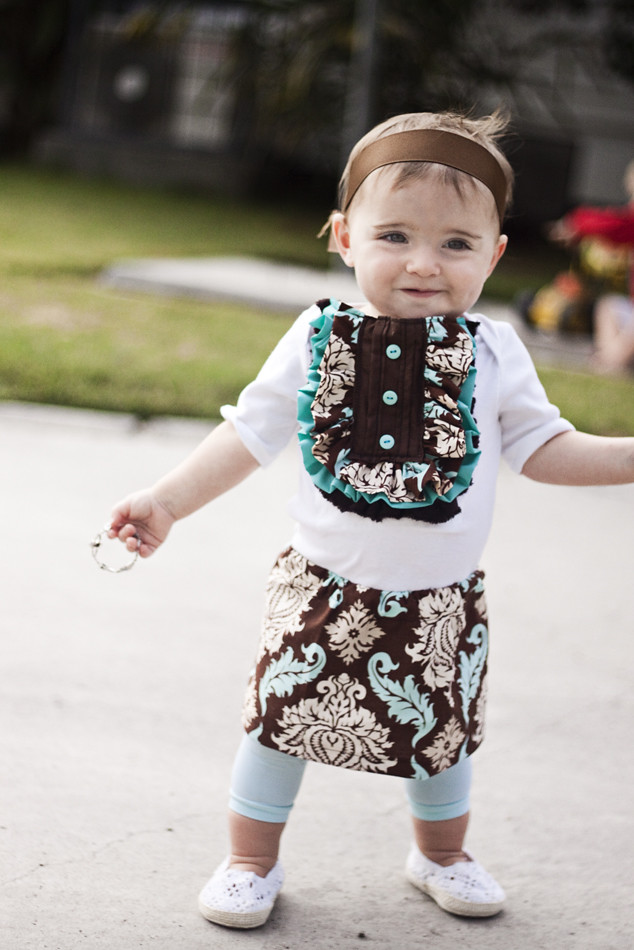
If you end up making one I would LOVE to see it so send me some pics or your link. Have fun and get creative, guaranteed if you live anywhere near a fabric store you will end up making a cuter one then mine, but you gotta use what you have right?
P.S. My friend Elizabeth found the website We Love Colors where I purchased Abby's leggings. I love them because they are nylonish so she isn't sweating bullets but is protected from the mosquitoes. They are nice and stretchy and she has been wearing them for 6 months now! The only draw back is the Velcro on her cloth diapers has made them snag a few times, bummers. Have I sold you on them yet ha! Happy sewing, hope your daughter looks dapper!
Monday, June 28, 2010
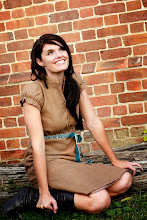
That is sooo Anthro-- baby
I have been extremely disappointed with the clothes online for Abby lately. Nothin I like at the GAP, Old Navy, Children's Place, Target and since H&M won't let you order online (so totally lame) I was left with nothing. Since all of Abby's clothes above 12 months were sent to storage (we have got to do this moving thing better next time) I was in dire straights. Since most patterns are not in PDF file (a gap that need to be remedied by someone) I decided to set out and make Abby a bunch of dresses from my own little mind. I thought maybe some where out there someone else would need the same thing so in the next few days I will be posting in depth detailed tutorials on the dresses I made. The first being my version of what Anthropology might make if they had a baby line... and I was crazy enough to spend that sort of money on baby clothes: Here is a sneak peak at it (made from a onsie) on the table. (There will be cuter ones of Abby modeling them with each). Let me know if you think this is a good idea or not because honestly I don't want to go to do all this and end up with ZERO comments ha! Okay enjoy the sneak peak (do you think I had enough parentheses in this post?)